Saturday, March 27, 2021

Just Us Girls #577 - Photo Inspiration

Hello friends!  The current challenge over at Just Us Girls is our Photo Inspiration Week.  Vicki chose this totally springtime photo. 

I went very literal with this photo inspiration challenge.  I started by blending some yellow and green inks in the upper and lower corners as seen in the photo.  Then I used this Pink Fresh layering stencil to create the wreath.  I used the colors from the tulips in the photo.  I stamped the greeting in black jack ink.  This is a dark gray ink color...I thought it would look better than black.  I die cut the panel with a stitched rectangle, spritzed it with shimmer and added pearls.  Easy peasy!

You can see more from the JUGs design team and our March guest on the JUGs blog
I'd like to thank our guest Shawna for being a great guest all month!

Thanks for stopping by!

Recipe
Stamps:  Greetings (Impression Obsession)
Paper:  Recollections white
Ink:  black jack (C. Pooler); mustard seed, twisted citron distress oxide; buttercup, sprout, parsley, honeysuckle, cranberry (C&9th)
Accessories:  Daisy Wreath layering stencil (Pink Fresh), stitched rectangle (MFT), pearls, shimmer spritz, craft foam


Thursday, March 25, 2021

Time Out #184 - Inspired by Words

Happy Spring!  I'm so happy we are in the "better weather" part of the year.  We are getting some warmer weather here in Western New York and today it is sunny and in the 60s.  It's so refreshing!

We have a new Inspired by Words challenge over at the Time Out blog, and the quote is so reminiscent of Sping!

We are sponsored by Altenew for this challenge.  

I have so many Altenew stamp sets.  I love their floral layering sets.  I chose this Hyacinth stamp and die set for this challenge because hyacinths remind me so much of Spring.  I have several in my garden and they smell delightful.  I started by cutting 1/4" and 1/2" strips of yellow, green, and purple cardstock and adhered them to the bottom corner of a white panel.  I die cut the images and then stamped them using Altenew inks.  I chose three shades of purple for the flowers and two shades of green for the stems and leaves.  I used yellow for the flower centers.  The sentiment is from a Papertrey Ink stamp set.  I mounted that white panel onto a purple panel (that panel is a lot lighter than it looks here!) and spritzed it with shimmer spray.  I added that to a white base and added purple and yellow crystals.

You can see more from our Time Out design team and our guest for this challenge, Helen, on the

Thanks for stopping by!

Recipe
Stamps:  Hyacinth (Altenew), Spring Hills (PTI)
Paper:  white, yellow, green, purple
Ink: Versafine onyx black; lavender fields, deep iris, midnight violet, maple yellow, bamboo, olive
Accessories:  Hyacinth dies (Altenew), crystals, shimmer spritz


Saturday, March 20, 2021

Just Us Girls #576 - Color Week

Hello friends!  This week over at Just Us Girls, Nancy is hosting our Color Week challenge.  She has chosen this beautiful array of colors.
 

I at first had a brain freeze with regards to these colors.  This is the second attempt at them. My first is below.  I just received this beautiful Altenew clematis stamp set and realized that these colors would look fabulous on it.  I originally bought the stamp set because I love clematis and have one growing in my garden.  It, however, is a beautiful dark pink color.  But I love it in the yellow as well.  I used copic markers to color it.  The card base is white so I added a gray piece of cardstock to it to mat the main panel.  I added yellow crystals and shimmer spray.  I'm adding that spray to almost every card!  It's so pretty!

This was my first attempt at these colors.  I wasn't sure about it, but the more I look at it, the more I like it.  It's much prettier in person.  I was playing with some Kitchen Sink Stamps that I've had forever (I think it was because of a Jennifer McGuire video!) and never used.  I stamped the half pear in browns and yellows then masked it to stamp the full pear and leaf.  I die cut it with an oval die.  I die cut a scalloped oval from dark green cardstock and adhered them together.  I found a Valentine paper pack that had the solid gray and patterned gray papers.  On the solid gray, I stamped and embossed the sentiment.  I adhered the pattern paper to it and the oval main panel is adhered with craft foam.  I added yellow crystals and that shimmer again.

You can see more from the JUGs design team and our March guest on the JUGs blog.

Thanks for stopping by!

Recipe Card #1
Stamps:  Paint-a-Flower Clematis (Altenew)
Paper:  White, gray
Ink:  Memento tuxedo black, Versafine onyx black, copic markers
Accessories:  Stitched rectangles (MFT), crystals, shimmer spray, craft foam

Recipe Card #2
Stamps:  Multi-step Pears (Kitchen Sink Stamps), Stacked Sentiments (PTI)
Paper:  White, handsome hunter, Yours Truly (Echo Park)
Ink:  shea butter, tiara, sand castle, over coffee (C. Pooler); parsley, evergreen (C&9th); Versamark
Accessories:  Stitched rectangle dies (MFT), oval dies (Spellbinders), white embossing powder crystals, shimmer spray, craft foam, masking magic paper (Gina K)


Friday, March 19, 2021

Color Hues #14 - Black & White

 Hi friends!  I saw that the current Color Hues challenge was a black and white challenge this time around and I had to play along!

I made a version of this same card in 2008!  I kept this stamp because I knew I'd be using it again.  I stamped the main image with Versafine onyx black ink, die cut it and mounted it on a black mat.  The vertical piece behind it was also stamped.  I used a long border wood mounted stamp and stamped it in the same ink.  It's also mounted on black cardstock.  The main panel was added with craft foam and I added pearls and shimmer spray.  This has always been my favorite Christmas card and I love the black and white.

Thanks for stopping by!

Recipe
Stamps:  Ornate Christmas (Inkadinkadoo); Stampers Anonymous wood mount stamp
Paper:  White, black
Ink:  Versafine onyx black
Accessories:  Rectangle dies (Spellbinders), pearls, shimmer spray, craft foam


Saturday, March 13, 2021

Just Us Girls #575 - Trend Week

Hello!  It's Saturday and that means a new Just Us Girls challenge is live!  This week, Bobby has chosen embossing folders for the Trend Week challenge.

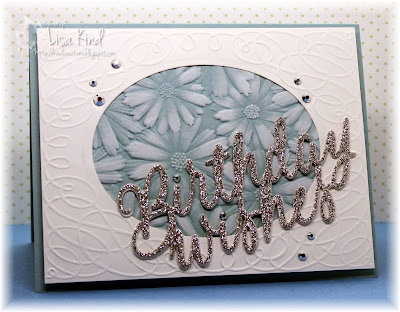
I have so many embossing folders that I purchased when the Cuttlebug came on the horizon.  Remember that?  It was definitely before dies came on the scene.  And right on cue, Jennifer McGuire has been posting some videos using them.  I cased one of her ideas with the two cards I have here today.  I started by pulling out my 3-D embossing folders.  I just have a few of those.  I chose this floral one and created two embossed panels with it.  One in this peach color and one in blue (below).  I then took a white pigment ink pad and highlighted the embossed parts by lightly running it over them.  On this one, I added Perfect Pearls to the wet ink (very difficult to see).  For the white piece, I first die cut the oval then put that panel into a regular embossing folder with a frame detail and embossed it.  I adhered that to the floral piece and added it to the base.  I die cut the sentiment twice from white cardstock and once from silver glitter cardstock and stacked them.  The silver crystals were added for shimmer.

I created this card in the same manner as the one above.  I used a different embossing folder for the frame, a different sentiment, and made this card landscape.

You can see more from the JUGs design team and our March guest on the JUGs blog.

Thanks for stopping by!

Recipe
Paper:  Recollections white, peach, blue, silver glitter
Ink:  Unicorn white
Accessories:  Floral Field folder (SSS), Frame folders (Cuttlebug), with sympathy die (Dee's Distinctively), Big Basics Birthday die (PTI), perfect pearls, crystals, craft foam


Thursday, March 11, 2021

Time Out #183 - Be Different

 Hi friends!  The new Time Out challenge this time around is challenging us to be "different".  Hmmm...

Our sponsor for this challenge is Funky Fossil Designs.

So I gave this some thought and decided to go with a coffee theme because (and don't hate me!) I do not like coffee!  I know what you all are thinking!  What???  My parents were huge coffee drinkers.  There was always a pot on the stove and they drank so much of it, but I never acquired a taste for it.  Love the smell, but the taste not so much.  Funny thing is my hubby doesn't drink it either.  He can tolerate it, but not on a regular basis.  His father was a huge coffee drinker too!  So that is what is different.  As I was making this, I wanted to find a way to make it fun.  I guess that is what is different about this card as well, that there are colorful coffee beans on it!  

I started by using the Coffee Cup stencil and blended violet ink through it.  Then I laid the Harlequin stencil over that stencil and used a darker purple ink to create that pattern on it.  The Coffee Cup stencil also includes the coffee cup piece.  I placed that over the inked coffee cup and placed the Lotsa Beans stencil over that and stenciled them using rainbow colors.  So that piece is actually one layer, although it looks like the cup is a die cut.  I die cut that panel with a stitched rectangle die and matted it with a black mat.  The sentiment was die cut three times from black cardstock for dimension.  I added crystals and shimmer spritz for that extra umph.

You can see more from the Time Out design team and our guest for this challenge, Lisa, on the 

Thanks for stopping by!

Recipe
Paper:  Recollections white, black
Ink:  worn lipstick, carved pumpkin, mustard seed, twisted citron, mermaid lagoon, wilted violet, dusty concord
Accessories:  Lotsa Beans, Coffee Cup, Harlequin stencils (Funky Fossil), stitched rectangle dies (MFT), for you die (Lawn Fawn), crystals, shimmer spritz


Saturday, March 6, 2021

Just Us Girls #574 - Word Week

 Hi friends!  The new challenge this week over at Just Us Girls is our Word Week challenge.  Ina chose the word ANIMALS.

I have a couple of cards to share today.  This first one is a simple mostly die cut card.  I used the Magic Iris Birdhouse Add-on die set to create this cute birdhouse.  I added the bird that comes with it to comply with the challenge.  I die cut the birdhouse from yellow and blue cardstock and embossed the yellow pieces with a woodgrain impression plate.  I added the sentiment in the middle and added crystals.  The background was stenciled with a stencil and blue ink.

I created this card also for the Color Hues current challenge using the yellow and blue challenge colors.

I had to make this card for friends who had to put down their beloved golden retriever Maggie May.  I die cut the piece and made sure to keep all the pieces.  I colored the rainbow pieces and dog with copic markers and used blue ink to create the background. I die cut the piece from black cardstock once again and clipped out the frame to put over the colored piece.  I stamped the sentiment and spritzed it with shimmer spray.

You can see more from the JUGs design team and our new guest for the month of March, Shawna
on the JUGs blog.

Thanks for stopping by!

Recipe Card #1
Stamps:  Fresh Bunch (SSS)
Paper:  Recollections white, yellow, blue
Ink:  Versafine onyx black, tumbled glass
Accessories:  Magic iris birdhouse add-on (Lawn Fawn), stitched rectangle die (MFT), water droplets stencil (Gina K), crystals, black enamel accents

Recipe Card #2
Stamps:  sentiment (MFT???)
Paper:  Recollections white, black
Ink:  Versafine onyx black, copic markers, tumbled glass
Accessories:  Rainbow bridge dog die (Waffle Flower), shimmer spritz

LinkWithin

Blog Widget by LinkWithin