
 Isn't that lamp post fabulous? And the sentiments Kristin has created (including a handwritten message by Tammy Hershberger) are just so wonderful for the holiday season. So all you have to do is play, and you'll be given this digital set! Great huh? Here's what I did with this challenge.
 I just had to put a picture of my dog, Lizzie, on here! Why would you want to see me or my DH, right? And she's so CUTE! Well, at least I think so! Anyway, I added the handwritten sentiment right on the picture using my editing software. I also resized the lamp post so it was smaller, then printed it out and cut and embossed it with a rectangle nestie. I used this SU paper, Christmas Cocoa (which I love) and soft suede and real red cardstock. The ribbon is also soft suede, and I added the red glitter dots. Super simple card to pull together.
So, are you "game"? Are you inspired to make something so you can receive this great set? I hope so! All you have to do is post a direct link to your project to Mr. Linky on the JUGs blog by Thursday, November 5 at 9:00 EST. If you post to an online gallery, use the key word JUGS5. After you play along and post your card in Mr. Linky before the deadline, email Just Us Girls and provide your email address and another link to your photo. One of us will respond with the digital Happy Holidays package just for you! How easy is that?
Here's a link to all the DT members as well as our Guest Designer, Tammy Hershberger:
Dana Gustafson
Kristin Bueter
Maria Levine
Mona Pendleton
Pam Imholz
Tracey Cuccia
Tammy Hershberger, Guest Designer
We hope you play along this week. We've had such a great response to our challenge blog after only a month, and we are so thrilled that you enjoy our challenges. This is another way to say "thanks to you"! Thanks for stopping in today, and have a great weekend!

 I wanted to use some fun bright colors, so I started with SU's retired paper called Frosty Day. This little girl is colored with copic markers and I've put some star dust stickles on the snow, snowballs and her scarf. The sentiment (also from the set) says it all! Remember throwing snowballs at each other? Such fun! I used Jen del Muro's sketch from last Saturday, but changed the circle to an oval to accommodate my image.
 I made a mini pizza box...such fun and so easy to make! I got mine from Jen del Muro a long time ago (last year sometime), but I'm sure there is a tutorial on SCS in the Resources section. I used a piece of pumpkin pie cardstock as my base, and the dp is from a Halloween stack from K&Co. Boy, this dp has seen some action this year! LOL!! It's really some great paper! The sentiment is from
  I got lucky with this dp...it's from DCWV All Dressed Up. It couldn't be more perfect! And the sketch from SCS yesterday couldn't be more perfect as well! I colored the cow with my W copics and a light R copic for the utters and ears. I added star dust stickles to the black spots (love that stuff). The black strip across the bottom was run through the distressed stripes cuttlebug folder. I added the sentiment and the candy dots, and I was done! Really a quick card, but so cute (at least I think so!).
 Would you have put these colors together if it weren't for a challenge? I wouldn't, but I guess that's the challenge! I kind of liked it in the end, too! Here's what I did with them.
  I used a new stamp from
 I used Bashful Blue as my base (because they found out they are having a boy) and this paper from the Making Memories Animal Crackers collection. I then cut two blue and two celery scalloped squares from nesties and placed a dimensional letter on top to create a block. (I used ABCD letters, one for each side.) Here's the top to show the tag.
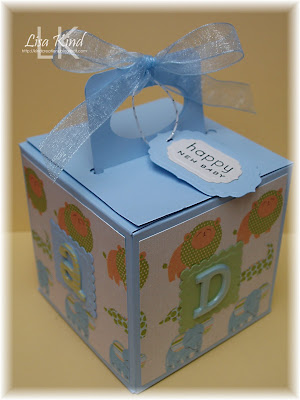 I used nesties to cut and emboss the tag, and


 I wanted the card to be black/white/pink, so I started with the black polka dot paper from PTI's Black & White Basics. I colored the white dots with a pink copic marker. The white dots were too stark. The pink dp is from an SU hostess stack in pretty in pink. I used

 Aren't these fantastic colors? I just thought Christmas and a sort of shabby chic look. These are Papertrey Ink colors, but you don't have to use them...they are just for reference. Here's what I came up with.
  I just bought this
 I had this smaller snowman from
  I took a piece of sahara sand (which matched my ribbon) that I had on my table from another project and stamped it with a swirl from
  Isn't this bird just gorgeous? See, I told you it was a great set! I colored the image with copics, then sponged in some So Saffron ink in the background. The berries on the branch is a separate stamp that fits on there perfectly. All you need is your stamp-a-ma-jig to place them on there just right! I cut around them before I cut out the image with this nestie. Our very own

 I KNEW I could handle this one! I just love chocolate and blue together! Today's sponser is
  I used the giraffe in the set because I really think they are an amazing animal! He's stamped in Chocolate Chip on the Sahara Sand cardstock and then colored with the Y00, Y000, and Y000 yellow copic markers. I also used B52 blue to accent his horns and tail. I added Star Dust stickles to them as well. The Chocolate Chip cardstock is the textured kind for more interest. I went through my extensive stash of dp and came up with SU's retired Urban Garden. The ribbon is actually River Rock, but it looks so much like Sahara Sand! The accents are also from Simon Says. I used the Mojo Monday sketch from this week as my starting point.
 , but flipped it to accommodate my image.
 This template is the petite one that comes with the set. It would hold quite a bit of candy corn (mmmmmm....) or a few pieces of the bite size Halloween candy. I just bought the Basic Grey Eerie dp at my LSS, Buffalo Stamps & Stuff, yesterday along with some other goodies. (Sidebar here: Patronize your LSS ladies! There aren't many of them and they are chock full of inspiration. I love mine and visit at least once a month!)
 Isn't that a cool graphic? The girls have really rocked the graphics for the blog, let me tell you! I was so excited when I heard that paper piecing was our challenge because I had just finished making 20 baby shower invitations for my nephew and his wife last weekend that I paper pieced. Here's my take on the challenge.
 This photo is somewhat washed out...it's much more colorful IRL. I used SU's new dp from their Holiday Mini catalog called Pawsitively Prints. The white mat was run through the cuttlebug using a Quick Kutz folder (I think!). I added star dust stickles to the carriage, too!
 Now I have to admit that I cased this from the ideas that come with the templates (this template is a FREE one by the way). I just added the tag I created with AI's most recent release
