Saturday, October 27, 2012

Just Us Girls #160 - Inspiration Photo Challenge

Hi friends!  Just Us Girls has a great photo inspiration challenge going on.

Here's a closeup of the photo inspiration.  What a fun table setting!

I have many fall related stamps to choose from, and I chose this new one.  It's from Art Gone Wild by a designer named Michelle Masters.  She has a topiary line that she designs.  I purchased this (and two Christmas stamps from her line) at a stamp show here in Buffalo, NY in the summer.  I just fell in love with these designs!  This one is the Acorn Topiary.  I colored it (or tried) using the picture on the front of the package and copic markers.  I hope I gave it justice!  I've been having such a hard time lately with creating lately...it seems my mojo is on vacation.  I added some star dust stickles on this image and used papers from PTI (Autumn Abundance and First Fruits).  The green panel was run through an embossing folder.  I threaded the buttons with floss and curled the ends.
 
The JUGs design team has some great inspiration for you.  Check them out at their blogs.


Thanks for stopping by!  Have a great weekend!
Photobucket

Saturday, October 20, 2012

Just Us Girls #159 - Color Challenge

It's Saturday!  So happy it's the weekend!  And we have a new challenge at Just Us Girls.  It's a color challenge brought to us by Marisa.  She chose these this great color palette.

 For some reason my mojo wasn't working when I made this.  I tried to color something, but it just wasn't working, so I went with a wordart.  This one is from PTI called We Go Together.  The pattern paper is Carefree from Authentique.  I added some pewter pearls and a basic grey tafetta ribbon.

This is the sketch I worked with from Sweet Sunday Sketch Challenge.  I changed out the flag for the ribbon.  

The design team has some great inspiration for you.  Check out the team's blogs.
Thanks for stopping by and have a great weekend!


Photobucket

Thursday, October 18, 2012

Pretty Palette #73

Hi there friends!  I'm here with another Pretty Palette color challenge.  I don't remember what the inspiration was for these colors, but I'm lovin' them!
 

This big, pretty flower is from the Be Dazzled digital stamp set from My Time Made Easy.  I colored it in GIMP using the colors from the swatch above.  I printed out two of them (wish I had printed three) and cut away part of one so I could layer it on top of the full one.  When I was coloring it in GIMP, I created a slightly darker shade of the blueberry so that it had more depth to it.  I added some Star Dust Stickles to the center of the flower.  The kraft embossed piece I found in my stash.  I believe that is an embossing folder from SU, as is the ribbon.  The paper is from My Mind's Eye called Moments.  The tag was punched with a Martha Stewart punch and I stamped the sentiment, from Tending the Garden acrylic stamp set (love all those little sentiments in that set...so versatile!) on it and attached it with some twine.  All of this was placed onto a black layer and then on some Neenah cardstock.

The sketch is a classic from Freshly Made Sketches.

You can see more inspiration using these colors on these blogs.
 
 
Thanks for stopping by today!


Photobucket

Saturday, October 13, 2012

Just Us Girls #158 - Technique Challenge

Happy Saturday everyone!  Are you ready for a technique challenge from Just Us Girls?  Vicki chose the old but ever so popular Emboss Resist technique.  You can find directions for it on SCS here if you've never tried this technique.

I thought I'd make a Halloween card today.  My inspiration was this paper tape from Martha Stewart.  The dp is from Authentique called Glowing.  The pumpkin is from Spooky Solids stamp set by Paper Makeup Stamps, and I embossed it with black embossing powder.  Then I used Wild Honey and Spiced Marmalade distress inks over it.  That spider is actually a button.  I laid it onto an orange flower and added the bling for the eyes.  The sentiment is from A Spooky Surprise set by My Time Made Easy.

The sketch is from this week's Mojo Monday.  Love all those banners!

Check out the design team's cards using this technique.
 
 
Thanks for stopping by!  Have a great weekend!
 
Recipe
Stamps:  Spooky Solids (PMS), Spooky Surprise (MTME)
Paper:  Neenah white, black, pumpkin pie, Glowing (Authentique)
Ink:  Versamark, Versafine Onyx Black, wild honey and spiced marmalade distress inks
Accessories:  Nesties, flag die (WPlus9 designs), prima flower, spider button, Martha Stewart paper tape, bling, dimensionals


Photobucket

Wednesday, October 10, 2012

Cowgirl Up!

Hi everyone!  My niece's birthday is Friday and I made this card for her.  She thinks she's a cowgirl!  LOL!!  She loves horses, her cowboy boots and hat, cowboy music, and shooting a shotgun!    So when I saw this image called Revolver Babe by Nellie Snellen, I had to buy it!  She was just too cute to pass up!  She's colored with copics, and I added some sparkle with some Spica glitter pens (hard to see in the picture).  I of course had to use this fabulous October Afternoon paper called Sasparilla for my cowgirl card!  Love it!

I'm playing along with the I Spy Sketch Challenge for this week.  It's a free for all, but you had to use one of their previous sketches.  This is the one I used from June 2012.

Now you know I'd have to link up a picture of my niece Andrea so you could see my inspiration for the card!  Love that girl!


Thanks for stopping by!
 
Recipe
Stamps:  Revolver Babe (Nellie Snellen)
Paper:  Neenah white, real red, Sasparilla dp (October Afternoon)
Ink:  Memento tuxedo black, copic markers, Spica glitter pens
Accessories:  Rounded banner and monarch border dies (MFT), riding hood red taffeta ribbon, star punch
 

Photobucket

Saturday, October 6, 2012

Just Us Girls #157 - Sketch Challenge

Hi friends!  Today over at Just Us Girls, we have a sketch challenge going on.  Andrea created this great sketch!  Lots of room for interpretation.

I love fall and love creating with fall colors.  These colors just feel so warm and comfy to me.  I used this great Basic Grey paper called Oxford as my starting point.  The leaves were created using the Leaf Prints stamp set and die from Papertrey Ink.  I used an old spectrum pad from SU called Pumpkin Patch to ink up the stamps.  I've always loved that stamp pad and don't use it enough!  The Sahara Sand panel under the leaves was embossed with one of those metal plates also from PTI (can you tell I don't know the name of it?).   I added a brown button, some twine, and a tag punched with a Martha Stewart punch.  The sentiment is from My Time Made Easy's Tending the Garden stamp set.  I added some dew drops in the corner.

I took a peek at the Color Throwdown challenge to look at their colors this week, and that's where my color inspiration came from (along with the beautiful, colorful leaves here in Western NY).  I'm so happy to be playing this challenge.  I haven't played in quite a long time!

You can see more inspiration using this sketch at these blogs.  Stop by and see!


Thanks for stopping by!  We are celebrating Columbus Day on Monday here in the US, so we have a long weekend!  Enjoy your weekend!
 
Recipe
Stamps:  Leaf Prints (PTI), Tending the Garden (MTME)
Paper:  Sahara sand, early espresso, Oxford (Basic Grey)
Ink:  Chocolate chip, pumpkin patch spectrum pad
Accessories:  Leaf prints die (PTI), twine, button, metal plate die (PTI), MS tag punch, dew drops
 
Photobucket


Thursday, October 4, 2012

My Time Made Easy - Tis the Season Review

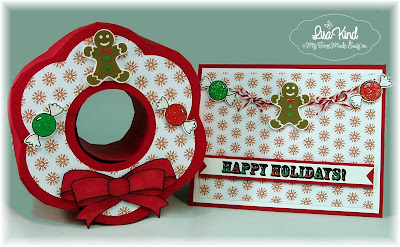
Hi everyone!  Today is the last day of postings for this month's My Time Made Easy October release.  I'm using the new template called Wreath of Wishes.
 
 This template sort of reminds me of a bundt pan!  Sounds funny, but when you take off the lid, it's got a tube in the middle and looks like a bundt pan!  I added the snowflake paper from the new Homemade Holiday digital paper pack.   The gingerbread man and bow are images from the new Homemade Holiday Labels digital stamp set and the candies are from the Homemade Holiday digital stamp set.  I colored them in GIMP and cut them out.  I added star dust stickles to them.  The bow was colored with copic markers.
 
The card was made from the same elements as the wreath box.  I made sort of a banner from the candies and gingerbread man.  The sentiment is from Homemade Holiday Sentiments digital stamp set.


The entire MTME design team is posting today.  Here are their blogs.
 
 
Thanks for stopping by today! 


Photobucket

Tuesday, October 2, 2012

My Time Made Easy - Post Release Day

Hi everyone!  Did you see the new products released yesterday at My Time Made Easy?  We have four new templates this month!  All of them fabulous, of course!  We also have five new stamp sets, three cut files, and paper too!  Oh my!  So much to choose from!  Today I'm using the Gifted template with some older products.  I really felt like making a fall project.

This template is really roomy! There are so many things that would fit nicely in here.   I have an orange candle somewhere in my house that I wanted to use, but I'll be darned if I could find it.  So I had to use this smaller ivory candle, but it still worked nicely.  

The decorative panels on the side are from the Autumn Leaves Collection 2 digital paper pack.  I love it paired with the pear colored cardstock.  I added some bling, a silk leaf, and some other fall adornments to the front of the box. 

The closure for the top of the box that Lauren designed it quite interesting. It's a bow that interlocks so that you can easily open the box. I added one of those little orange things (I don't know what they are!) on top of the bow.

The card uses the same paper and the Thankful stamp set.  I colored the leaves and acorns with copics and added some star dust stickles.  The label is from the new Homemade Holiday Labels cut file.

The girls have lots to share today, so make sure you stop by these blogs. 
 
 
Thanks for stopping by! 


Photobucket

Monday, October 1, 2012

My Time Made Easy Release Day - Ribbon of Awareness

Hi there friends!  Today is release day at My Time Made Easy and this post is a very emotional one for many of the design team members.  Typically in October we celebrate breast cancer awareness, but today we are celebrating awareness of all types of cancer.  Each of the girls is creating with this new template called I Support You in a color that touches each of their hearts.  When we were chiming in about the color we were using and the reasons for using that color, we were amazed at how many of us were touched by this terrible disease at some point in our lives.

I have a very personal connection with this disease.  My only brother, Jim (or Jimmy as we always called him) was afflicted with colon cancer that spread to his liver.  This disease took his life at the tender age of 46.  He left behind three young children.  It will be 15 years this November 20 that he left us.  When I say he was the nicest guy ever, there wouldn't be one person who knew him who would deny that fact.  I miss him terribly and think about him everyday.  He was nine years older than me, but we were very close.

When I looked at the ribbon colors, brown was the color of colon cancer with blue being another color to represent it.  So I combined the two.  This is probably my favorite color combination anyway!

 I created the box from chocolate chip cardstock and then added this retired paper from SU called Parisian Breeze.  It had the brown and blue colors in it I needed.  I tied a blue dotted ribbon around it and added this flower I found in my stash.  It was made by a fellow crafter I met at a stamping event this spring.  I saved it for future use and it was the perfect accent for my bow.

Here's a side view of the box so you can see that it's quite deep.  There are three different options for the center.  You can leave it plain (no opening), cut out the heart like I did here, or cut out an oval.  There is a piece of acetate covering up the hole so your contents stay put!

There is a new digital stamp set to go along with this template called Be Supportive.  There are so many wonderful sentiments included that cover just about any situation.  The ribbon is included in it as well, and I colored it in blue in GIMP and layered this sentiment that was perfect for me when I think about Jimmy.  I cut it out using the new cut file called Homemade Labels.  I layered it onto another larger label in the chocolate chip and added the pearls.  I didn't make a card for this label because I have a special place for this label.

It's going to be sitting on this picture of Jimmy that is on my bay window in my living room directly across from my couch so I can see him.  Love you Jim!

I hope you can stop by the following blogs to see what the other design team members have to share with you.  And I also hope you go to the MTME store and purchase some awesome new products!
Thanks for stopping by and reading about my story.  I hope you have a fabulous day!  Give your loved ones a big hug!


Photobucket

LinkWithin

Blog Widget by LinkWithin