Saturday, May 31, 2014

Just Us Girls #243 - Wild Card {Shaving Cream Technique}

Hi everyone!  It's Wild Card week over at Just Us Girls, which means the hostess gets to choose any type of challenge she chooses.  Sharyn is the hostess this week and she's chosen an oldie but a goodie...the shaving cream technique.  I have to admit that I've never done this technique before, and I groaned when I saw it.  I thought it was going to be a pain to do!  But I found it was a really cool technique and I loved the results!
 
I used two reinker colors in Tangerine Tango and Marigold Morning.  I love orange, so it was easy to choose the tangerine!  I just received this butterfly die set from Lil' Inkers, so after I did the shaving cream technique, I die cut the butterflies from the resulting paper.  I also added a little strip of the paper on the side of the white panel.  I love that stitched trail line of the butterfly too.  It's a separate die, so you could use it for anything that flies (I'm thinking bees!).  I added bling to the butterflies and the sentiment.


We are saying a fond farewell to our May Guest Designer, Barbara Campbell this week.  She's been a fabulous guest! 
 
Stop by these blogs to see what the design team did with this technique!
 
 
Thanks for stopping by!  I'm off to the Santana/Rod Stewart concert tonight and my cabin tomorrow.  The weather is supposed to be in the 80s!  Finally!  Enjoy your weekend!
 
Recipe
Stamps:  Tag You're It (MFT)
Paper:  Neenah white, tangerine tango
Ink:  Versafine onyx black, tangerine tango and marigold morning reinkers
Accessories:  Stitched butterfly dies (Lil' Inkers), bling, shaving cream


Photobucket

Saturday, May 24, 2014

Just Us Girls #242 - Photo Inspiration Challenge

Hi friends!  There's a new Photo Inspiration challenge over on the Just Us Girls blog.  Vicki chose the photo this time and I just love it!

Here's a closer look at the photo.  So much inspiration!
 
This is what I came up with.  I of course could not ignore the black and white stripes.  I like how the stripes were offset, so I set out to recreate that.  I found this piece of paper with black and white diagonal stripes.  I cut a two inch strip then cut it in half and laid it down on another two inch strip of thin white cardstock.  I offset the stripes before adhering it to the cardstock.  Then I saw a card on the Case Study challenge blog that used PTI's button dies.  I had been wanting to use them, so I pulled them out and cut several from pink, green, blue, and yellow cardstock. (I took these colors from the flowers and two vases in the photo.)   I was worried that the colors might look too baby-ish, but I think the black made it more sophisticated.  I layered some buttons and put the bigger ones up on dimensionals.  I added some Wink of Stella shimmer on some of the buttons and then filled in the bare spots with enamel dots.  I kept the sentiment simple.


You can see the card I took my inspiration from here on the Case Study Challenge blog.


Stop by the JUGs DT blogs to see what amazing cards they created!
 
 
Recipe
Stamps:  Strictly Sentiments (WPlus9)
Paper:  Neenah white, pink pirouette, pear pizzazz, barely banana, soft sky
Ink:  Versafine onyx black
Accessories:  Button Stacks, Button Stacks II, Bitty Button Stacks dies (PTI), Wink of Stella shimmer, enamel dots, dimensionals


Photobucket

Thursday, May 22, 2014

Time Out Challenge #6 - Home Sweet Home

Hi everyone!  The next Time Out challenge for the next two weeks is our Home Sweet Home challenge where we provide a homey picture for you to use as inspiration.  This picture is sort of Moroccan in feel.  This outdoor room looks so comfy!

I chose the colors as the inspiration for my card today.  I saw kraft, a light and dark rose, dark yellow, and turquoise.  This is what I came up with.  I pulled out this dahlia flower set that is a three-step stamping process.  I found some old SU papers in kraft and I loved the white polka dots! I added a few more enamel dots than I usually do...love them too!

The other inspiration for my card was this sketch from Sweet Sunday Sketch Challenge.
You can see more inspiration from the Time Out team and Christine, our guest for this challenge.
Thanks for stopping by!
Recipe
Stamps:  Delightful Dahlia Additions (PTI), Oh Happy Day (Avery Elle)
Paper:  Neenah white, kraft, SU dp
Ink:  Butter bar (Hero Arts), melon mambo and tempting turquoise (SU), sweet plum (Memento Luxe)
Accessories:  Delightful Dahlia dies (PRI), enamel dots, star dust stickles, dimensionals


Photobucket

Saturday, May 17, 2014

Just Us Girls #241 - Color Challenge and Birthday Blog Hop!

Hi everyone!  I'm the hostess this week over at Just Us Girls for the color challenge.  I chose kraft, orchid, and white.
 
I really like this combination!  I started by sponging some orchid ink through a stencil for the background.  Then I die cut two butterflies - one solid and one a detailed cut.  The solid one was cut from orchid paper and the detailed one from white card stock.  I ran it through the Xyron machine and covered it with Stickles dry glitter.  The sentiment was stamped with kraft ink.  I embossed the bottom of the kraft card stock with one of those single strip embossing folders.
 
I'm also participating in a birthday blog hop for Sandie from London Times.  Her birthday was yesterday and there's a Linky Tool on this blog if you know Sandie (or not!) and want to link up a birthday card for her.  Happy Birthday Sandie!  I hope you enjoyed your day!
 
I loosely followed this week's CAS(E) this Sketch.

You can see more inspiration from the JUGs DT and our guest designer.
 
 
Thanks for stopping by!


Recipe
Stamps:  Stylish Sentiments: Birthday
Paper:  Neenah white, kraft, Uptown dp (retired SU)
Ink:  Kraft (MFT)
Accessories:  Darla and Vivienne dies (Memory Box), Stickles dry glitter, Xyron machine, stencil (Studio Calico), embossing folder, bling

Photobucket


Monday, May 12, 2014

Communion Card

Hi everyone!  I hope everyone enjoyed their weekend, especially Mother's Day!  We had a lovely day yesterday at our cabin.  Beautiful weather to be sitting on our porch! 
 
I also had a communion party to go to on Saturday.  I don't know why, but I always have such a hard time trying to come up with ideas for those types of cards.  So, I went to my trusty Splitcoast Stampers site to find some inspiration, and I found this lovely card.  Since it was Saturday morning and I had to get the card done pronto, I cased it!  I first embossed the white panel with a Lil Inkers frame (first time using it!), then embossed the cross and sentiment in silver embossing powder.  Then I used an MFT flower and flourish die and an SU retired flower punch.  The invitations for the event were pink, white, and gray, so I used those colors.  (The card I cased used those colors too which is why I cased it!)

The card was an unusual size for a regular envelope, so I created one with my envelope punch board! Love that thing because I can use so many of the 12 x 12 paper I have in my stash!

Thanks for stopping by!  I'll update  my supply list later because I'm at work and forgot what I used!

Photobucket

Sunday, May 11, 2014

Happy Mother's Day!

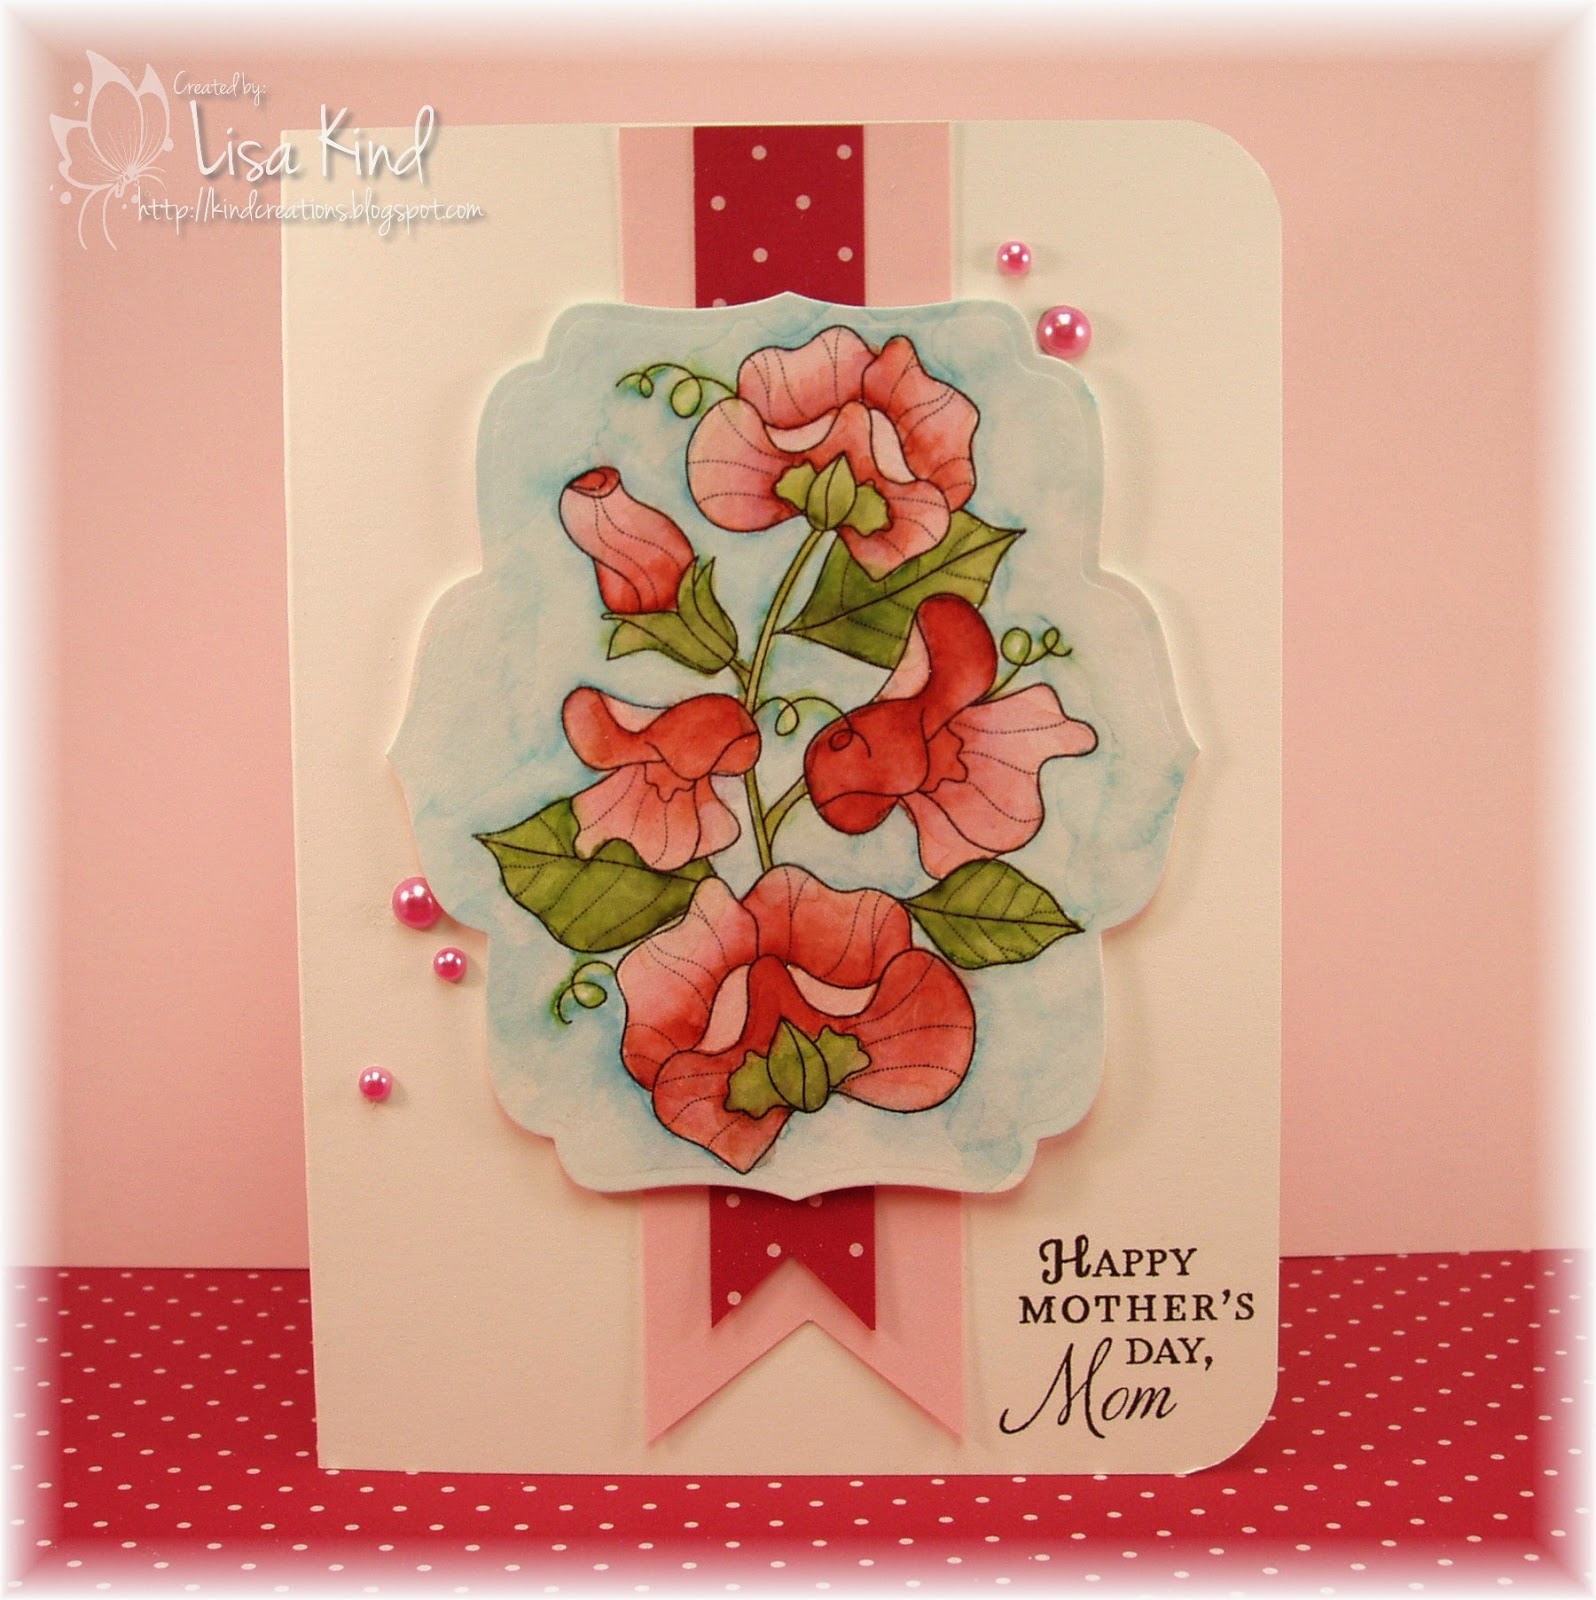
Happy Mother's Day to all of you hard-working moms out there!  I have a mom and a mother-in-law that I painstakingly made cards for last night.  They took a long time to make, but I was having fun and it was for a good occasion!

I'm taking the Online Card Classes Watercolor for Card Makers class, and I watched a video by my favorite stamper, Jennifer McGuire.  So I of course had to try her technique!
 In her video, she embossed her image with white embossing powder.  On my first card I, of course, forgot to do that and stamped it in black Archival ink.  I was not happy with the result  until I finished the entire thing.  I almost tossed it, but with watercoloring you can play around with the colors even after it's dried.  That's what I did here.  I didn't give up.  I colored the image with Distress markers in fired brick and spun sugar for the flowers and mowed lawn and forest moss (?) for the leaves.  I didn't like the way the leaves came out at first (too muddy-looking), but they look fine after a while.  I added some blue in the background with tumbled glass.  This actually wasn't my favorite of the two, but looking at it now, I like it so much more!

Here is my second attempt, the way Jennifer did it.  I like it much better in person.  It really is so much prettier than how the camera captured it.  I embossed this one in white embossing powder.  It was actually easier to color embossed.  Here I used spun sugar and picked raspberry for the flowers and just mowed lawn for the leaves.  I like the leaves better in this one.  Again, the background was colored with tumbled glass, but I think I used too much color.   I finished both off with some banners, the sentiment, pearls, and some Wink of Stella shimmer which you cannot see in the picture.

I hope you have a great day with your families.  We are off to our cabin for the day.  It's supposed to be in the 70s and sunny today, something we so desperately need!
Thanks for stopping by!

Recipe
Stamps:  Year of Flowers: Sweet Pea (PTI), Motherly Love (Flourishes)
Paper:  Neenah white, Tim Holtz watercolor paper, certainly celery, pink pirouette, retired SU dp
Ink:  Versamark, Archival black, Versafine onyx black, Distress markers:  picked raspberry, spun sugar, fired brick, mowed lawn, forest moss, tumbled glass
Accessories:  Spellbinder's die, pearls, white embossing powder, dimensionals

Photobucket

Saturday, May 10, 2014

Just Us Girls #240 - Technique Challenge

Hi everyone!  The challenge over at Just Us Girls this week is a technique challenge.  Sue V. is the hostess and she chose the Kissing Technique.  I love this technique and I got to use some perfect stamps for this technique.
 
When you do this technique, you want to use a stamp that has a lot of surface area.  I went looking through my stamps and found this retired one from SU.  I stamped the flower in Memento Luxe ink (I found that pigment inks worked best for this technique) and then "kissed" it with Tim Holtz's Reflections stamp.  It left the words imprinted the correct way (not backwards) on the image.  Then I stamped it on the paper and fussy cut it out.  The rest of the card is pretty self-explanatory.
 
The design team did an amazing job with technique.  You can check them out at these blogs.
 
 
Thanks for stopping by!
 
Recipe
Bodacious Bouquet (SU), Boutique Borders: Thanks (PTI), Reflections (Tim Holtz)
Paper:  Neenah white, melon mambo, Delovely
Ink:  Versafine onyx black, Memento Luxe inks: rose bud and pearl tart
Accessories:  Border punch, enamel dots, dimensionals
 

Photobucket

Thursday, May 8, 2014

Time Out Challenge #5 - Inspired By Words

Hi everyone!  I cannot believe we are in our 5th challenge over at the Time Out blog!  We've got a good one for you this week.  You are to create a project inspired by the following words:
 
"Time flies, Love lasts"
 
Aren't these great words to live by?  Time certainly does fly, but hopefully love stays constant.
 
Here's my interpretation of these words.  Just this weekend, I went to my LSS and purchased this stamp set and coordinating dies from MFT.  As I was looking at them, I thought it would fit with this challenge.  I was thinking of my good friend in Columbus, OH that I haven't seen in a few years and how we keep saying we are going to get together soon.  We remain good friends, but time sure has flown since we've seen each other.  We have to rectify that real soon!  I added the hearts on the phone and impressed them on the black panel to get the "love" in there.
 
I also used the sketch from Retro Sketches.
 
You can see more inspiration from the team at these blogs, as well as from our guest designer for this challenge, Karen.
 
 
You have two weeks to play with this challenge.  We hope to see you playing along!
 
Recipe
Stamps:  Friend request (MFT)
Paper:  Neenah white, black, marina mist, real red, Bitty Dot dp (PTI)
Ink:  Versafine black onyx
Accessories:  Smart phone die (MFT), Sizzix heart embossing folder, glossy accents, Wink of Stella shimmer brush, dimensionals
 

Photobucket

Monday, May 5, 2014

Online Card Classes - Watercoloring

Hi everyone!  Today is day 1 of the Online Card Classes Watercolor for Card Makers
 There were three different watercolor techniques presented today, and I chose to do one that Kristina Werner taught.  I used a retired background stamp from SU called Hand Stitched, some white embossing powder, and water color paints to create this strip.  It started out as a full panel, however I wanted to follow the Clean & Simple sketch, so I cut it in half.
 
Here's the sketch.
 
I'm also entering this into the Catered Crop button challenge.
Catered Crop Recipe Swap Button
 
Sorry for the short post, but I didn't want to give too many details since this is a class that's paid for.  Also, it's kind of late and I need some sleep!
 
Thanks for stopping by!
 
Recipe
Stamps:  Hand Stitched (SU), Take Flight (Clearly Besotted)
Paper:  Tim Holtz watercolor paper, Neenah white, calypso coral
Ink:  Versamark, watercolor paints
Accessories:  Button, floss, white embossing powder, enamel dots, sequins, dimensionals


Photobucket

Saturday, May 3, 2014

Just Us Girls #239 - Sketch Challenge

Hi everyone!  My good friend Cheryl has created a great sketch for our Just Us Girls sketch challenge.
 

I knew as soon as I looked at the sketch that PTI's new Botanical Blocks set was going to work perfectly.  I just love sunflowers (see my blog design?) and fell in love with this sunflower.  I love how Nichole Heady colored hers when she revealed it, so I used the same copic colors she used. ( My BG72 copic marker ran out of ink before I could finish blending the colors!)  The horizontal piece was cut from a new die I purchased at JoAnn's.  It's from a new Spellbinder's line.  I added the sentiment and enamel dots to finish it off.
 
We have a new guest for this month.  Please welcome Barbara Campbell.  Stop by the DT blogs for more inspiration.


I'm also entering this in Crazy 4 Challenges.  Their challenge is called April showers bring May flowers and you have to use a flower on your card.

Thanks for stopping by!
 
Recipe
Stamps:  Botanical Blocks (PTI)
Paper:  Neenah white, early espresso, X-Press It blending paper, Ambrosia (Basic Grey)
Ink:  Memento tuxedo black, chocolate chip, copic markers
Accessories:  Spellbinders long die set, enamel dots, Wink of Stella shimmer brush, dimensionals 
 

Photobucket

Thursday, May 1, 2014

Time Out Challenge #4 Reminder

Hi friends!  I don't know if you have played or not, but I'm just sending out a reminder to all of you about our current challenge in which we are casing this fabulous card by Viginia Lu.
 

My last entry for this challenge (you can see it here) was a tag and I just used the colors, that fab flower, and the circular twine.  This time, it's almost an exact CASE!  I did sub the black for brown and the flower is felt.  I did emboss the sentiment clear embossing powder over brown pigment ink.  I left off the twine and added some enamel dots.

You can see some of the other reminder cards on the Time Out blog as well as the winners for Challenge #3.  Is it you?

Thanks for stopping by!

Recipe
Stamps:  Botanical Blocks
Paper:  Sahara sand, chocolate chip, vintage cream, Marrakech dp (Basic Grey)
Ink:  Versafine brown
Accessories:  Prima donna petals die (MFT), felt (PTI), enamel dots (Color Theory), clear embossing powder

Photobucket

LinkWithin

Blog Widget by LinkWithin