Saturday, February 26, 2022

Just Us Girls #620 - Photo Week

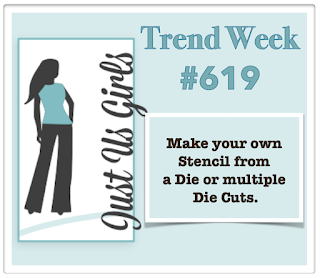
Hi friends!  It's Photo Week over at Just Us Girls and Carol McFarland chose this adorable photo!  I love it!

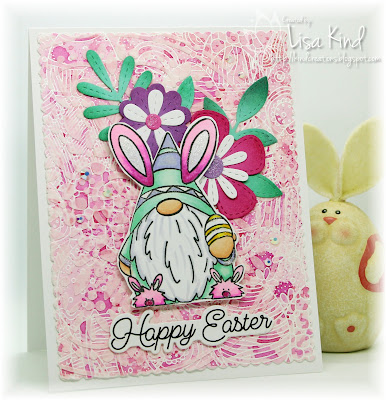
I pulled out my basket of Easter stamps and came across this Easter gnome.  Look at those bunny slippers!  LOL!  I colored him with copic markers and fussy cut him (ugh...no dies!)  Then I went to work on the background.  I wanted to do something different.  I saw Amy Rysavy creating some great backgrounds so I went that route.  I started by stamping an Easter egg background stamp with Versamark on water color paper and then heat embossed it with white embossing powder.  Then I pressed various pink distress inks onto a non-stick mat, added water to it and pressed the paper into it.  I did this several times, drying it in between.  When that was dry, I laid a stencil on it and spread embossing paste over it.  It's hard to see in the photo, but the texture is really cool!  I then die cut some flowers and leaves from colored cardstock and shaded it with coordinating inks.  The sentiment was stamped and die cut three times for dimension.  The gnome was given dimension by placing craft foam behind it.  I finished it with crystals and shimmer on the gnome.

You can see more from the JUGs design team on the JUGs blog.

Thanks for stopping by!

Recipe
Stamps:  Easter Gnome (Whipper Snapper), Easter Buddies (Honey Bee), Doodle Egg bg (SSS)
Paper:  Canson water color, white, pink, purple, green
Ink:  Versafine onyx black, Versamark, Memento tuxedo black, kitsch flamingo, picked raspberry, worn lipstick, copics
Accessories:  Audrey Cutaways (W&W), Stitched Blooms dies (MFT), Spring Boho Circle (SSS), embossing paste, white embossing powder, crystals, shimmer, craft foam


Thursday, February 24, 2022

Time Out 8th Birthday Celebration!

 Hi friends!  I was humbled to be invited to join my ex Time Out teammates to celebrate Time Out's 8th birthday celebration!  I was on the team from it's inception until I resigned last June.  It's a great team and a great challenge.  So I was so happy to be asked to celebrate along with them for this challenge.

So, obviously, the theme is birthday.  I made this card using a stamp, stencil and die bundle from The Greetery.  I made this so long ago, I can't remember how I did it, but I think I stamped the first layers of flowers and stems and then used the stencil to add details.  After stamping and stenciling, I die cut the image.  I layered a black and white pattern paper on a black mat and added the wreath (which was given dimension by adding two other wreaths behind it) and the sentiment (also given dimension with more die cuts) which was stamped in black ink and embossed with clear embossing powder.  I added star dust stickles on the orange flowers and black crystals.  

Below are the sponsors for this challenge.  They have been very generous.

Alex Syberia  -$15 store credit
Altenew:  $20 store credit
CAS-ual Fridays:  $25 store credit
Lawn Fawn:  $25 store credit
Newton's Nook:  $25 store credit
Stamplorations:  $25 store credit
Birch Press: $20 store credit 
Poppystamps:  $20 store credit

We hope you'll join in the celebration!  Check out the Time Out blog for more from the Design Team and other former Design Team members.

Thanks for stopping by!

Recipe
Stamps:  Print Shop: Floral Frame (The Greetery), Perfect Sentiments (Pink Fresh)
Paper:  White, black, Cedar Lane (Pink Paislee)
Ink:  Versafine onyx black; sweet mustard, marigold, persimmon, fresh pear, olive (Pink Fresh)
Accessories: Print Shop: Floral Frame stencil & die (Greetery), Perfect Sentiments die (PF), stitched rectangle (MFT), clear embossing powder, star dust stickles, crystals


Saturday, February 19, 2022

Just Us Girls #620 - Color Week

 Hi friends!  Just Us Girls has posted its Color Week Challenge.  Ina is our hostess and has chosen teal, orange, and dark brown.

I love this color combo, but I'm not gonna lie...I had trouble!  It's not so much with the colors, but trying to fit the colors to work with the wreath.  This is a three-step image, so I thought it would work great with the trio of colors.  This is the fourth try.  First it didn't work because the brown wasn't dark enough.  Then I got the right brown, but the colors didn't jive with the part of the stamp I was working with, and it went on and on and on until I got it to finally work out!  Once I got the colors right with the correct layer, I die cut it with the coordinating die.  Then I stamped the sentiment which is a two-step stamp.  I used the correct orange, but picked up one of the lighter browns in error for the bottom part!  UGH!!  I was too frustrated by then to redo it, so that's why it's lighter!  Also the teal looks more green here in the photos, but it does look darker in real life.  I added a twine bow and some pearls to the main panel.  I mounted it on a teal mat.  I still think it's pretty, but such a simple card should not have given me so many fits and starts!  LOL!!

You can see more beautiful designs from the JUGs design team on the JUGs blog.

Thanks for sticking with me!!

Recipe
Stamps:  Overlapping Leafy Wreath (Pink Fresh), Sentiment Squared (The Greetery)
Paper:  white, teal
Ink:  Aquamarine, apricot, doe, gathered twigs (Pink Fresh)
Accessories:  Overlapping Leafy Wreath die (PF), Sentiment Squared die (Greetery), stitched rectangle (MFT), twine, pearls


Saturday, February 12, 2022

Just Us Girls #619 - Trend Week

 Hello!  The Trend challenge this week at Just Us Girls is to make your own stencil.  Sue came up with this challenge, and I had such fun with it!

This is my first attempt.  I die cut a cover plate and used that as my stencil.  Very simple technique.  I used a bunch of rainbow colors and blended them onto a piece of white cardstock using the piece I die cut.  I wanted to add something to the middle of those designs, so I cut small pieces of white glitter paper and adhered them to the die to get those little pieces.  Then I added crystals to the centers of each one.  I die cut the sentiment from black cardstock and the shadow from white.  

When I was done, I was left with this colorful piece I used as my stencil.  I couldn't let it go to waste, so I added it to a white card base and added the sentiment and crystals.  

I was trying out different cover plates to use as stencils, so here's another one I created.  I die cut the "stencil" from cardstock and used it with blue ink to create this panel.  I die cut the sentiment from holographic paper and adhered it to the white shadow.  I added silver crystals.

Once again, I had the "stencil" that I couldn't discard, so I added it to a white card base.  I wanted to fancy it up a bit, so i die cut these flowers and leaves fro white cardstock.  I blended color onto the leaves a two of  the flowers and added them to the front.  The sentiment is from a foiled sentiment pack, and I added silver crystals.

That's it from me!  You can see more from the JUGs design team on the JUGs blog.

Thanks for stopping by!

Recipe Card #1 & #2
Paper:  White, black, white glitter
Ink:  Passion fruit, apricot, lemon whip, fresh pear, sky blue, soft lilac
Accessories:  Dodec cover die (Altenew), stitched rectangle (MFT), hugs die (Birch Press), just because die (SSS), crystals

Recipe Card #3 & #4
Paper:  White, holographic
Ink:  Summer shower
Accessories:  Cozy flannel cover die (Altenew), stitched rectangle (MFT), stitched blooms (MFT), scripty happy birthday die (SSS), foiled sentiments (Pink Fresh), crystals


Saturday, February 5, 2022

Just Us Girls #618 - Word Week

 Welcome to February!  Only five months until summer here in the Northern Hemisphere!  We have a new challenge going on over at Just Us Girls.  It's our Word Week and Cecile chose the word FRIENDS.

I've been on a hot foiling kick lately (lots of that going on in blogland!) and a Pink Fresh Studio obsession!  I started by hot foiling the background with speckled aura hot foil.  It's so pretty in the light!  I had these floral die cuts already die cut in plain white.  I used the stencils to add the color to them then stamped the outline in black.  I went with blue flowers because I knew I was going to use yellow for the lemons and I love blue and yellow together.  I only wish I would have stenciled the small flower yellow as well.  Anyway, after stenciling, I added them to the foiled base and adhered with the pre-printed foiled sentiment with dimensionals.  I mounted this panel on a navy panel and added gold sequins.

When I initially die cut the foiled panel above, I used a larger stitched rectangle.  But when I was putting the card together, I realized I wanted that panel smaller so I could add the navy panel.  So I die cut it with a smaller die, leaving this leftover "frame".  It was too pretty to throw away, so I made another card!  This time, I adhered the frame to the navy panel.  I then foiled the flowers and sentiment using that same speckled aura foil.  I colored the flowers with copic markers.  I arranged them on the navy panel (they should have been adhered lower on the panel) and added the same gold sequins.  

That's it for this post!  You can see more from the JUGs design team 
on the JUGs blog.

Thanks for stopping by!

Recipe Card #1
Stamps Citrus Bloom (Pink Fresh)
Paper:  Hammermill, white, navy
Ink:  Sunshine, sweet mustard, mint, key lime, summer shower, seaside, blue jay (PF); Versafine onyx black
Accessories:  Citrus Bloom dies & stencils (PF), lush vines hot foil plate (PF), stitched rectangle (MFT), foiled sentiment (PF), speckled aura hot foil, gold sequins, craft foam

Recipe Card #2
Paper:  Hammermill, white, navy
Ink:  copics
Accesories:  Lush vines hot foil plate (PF), elegant occasions sentiment hot foil plate and die (Spellbinders), magnolia bouquet hot foil plate and dies (Spellbinders), stitched rectangle dies (MFT), speckled aura hot foil, sequins


Friday, February 4, 2022

Color Hues #34 - Red & Black

 Hi friends!  I'm slowly getting back into joining challenges again.  I used to participate in them quite frequently, and I don't know why I stopped.  Anyway, I made this for the current Color Hues challenge.  The colors are red and black.

I pulled out this triple-step stamp set from Concord & 9th and stamped two of the stamps to create this heart in red and one in black.  I then stamped the flowers separately in red and die cut them so I could add dimension to the heart.  The sentiment is an old one from Verve.  I stamped it on the die cut flagged sentiment strip and added red pearls.  I wanted something other than a plain white mat to adhere the heart to.  I pulled out a thin frame die and die cut the white panel and a black and white piece of pattern paper.  I love the impact these thin frames create.  You really can't see it in the photo, but I spritzed the card with shimmer.  I love the subtlety of it.

Here's the link to the Color Hues challenge blog.  Lots of inspiration there!

Thanks for stopping by!

Recipe
Stamps:  Triple-step Blooming Heart (C&9th), Hearts on Fire (Verve)
Paper:  White, black, Yours Truly (Echo Park)
Ink:  Versafine onyx black, candy apple
Accessories:  Triple-Step Blooming Hearts dies (C&9th), stitched rectangle die (MFT), thin frame die (SSS), pearls, dimensionals, shimmer spray

LinkWithin

Blog Widget by LinkWithin