
 But I'm adding to my stash of Christmas cards (add one more thing to the list: send out cards this weekend!) with this Just Us Girls technique challenge Maria chose. It's called sparkly stained glass. There's a tutorial on SCS using glitter (which I used), but Maria says she uses stickles for hers. I think that is much less messy as I am covered in glitter as I write this!
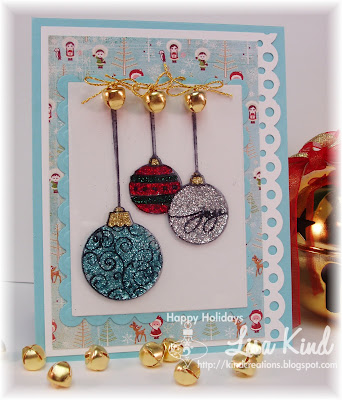 I have to admit that I was going to back out of this challenge because I thought it would take too long and I was very tired last night, but I managed to pull together some energy and try this fun challenge. There is a tutorial here on SCS and Beate does a very nice job of demonstrating it in a video. I used a very pretty image from a new set from Paper Makeup Stamps called Christmas Cheer. It was the perfect image to use.
I first stamped the image on acetate using black Stazon. Then I added Crystal Effects to parts of the ornaments and added the glitter (glitter that I have had forever and glad to use up). I repeated that for the various colors. I let it dry about 15 minutes, then hit it with my heat gun for a few seconds to help it dry. On my first try, the mistake I made was running this image through the cuttlebug...splat! All the glitter just smooshed all over the place! So I started over on a piece of acetate I cut first, then stamped, glued, glittered! Much better results! I adhered it with some glue dots behind the ornaments and the gold bells. The rest is pretty self-explanatory.
Stop by the JUGs blog and see the amazing cards the DT and our guest designer, Elise Durenberger, have done with this technique! Thanks for stopping in today and happy shopping and decorating!
Recipe
Stamps: Christmas Cheer (PMS)
Paper: Neenah white, cool caribbean, Eskimo Kisses dp (Basic Grey)
Ink: Black Stazon
Accessories: Nesties, glitter, Crystal Effects, glue dots, MS punch, gold thread and bells

4 comments:
Lisa you rocked it! Go you! This is awesome and oh so sparkly!!! Nice job!!!!
Lisa Lisa I'm SO glad you didn't sit out this is magnificent - I LOVE IT! I do'nt have a clue why my crystal effects didn't work or why my stazon was ucky but you rocked it - LOVE the three ornaments AND teh jingle bells.
There is certainly a bit of a learning curve with this technique {mostly PATIENCE!!! hee hee}, but, sister, YOU GOT IT RIGHT! This just does something GLORIOUS to my soul to look at. I guess the glitter + stamps embody the magic of Christmas "twinkle" factor. I'm SO glad this card survived to tell the story: it's awesome!
WOnderful Lisa! So glad you gave this another go after the big "smoosh". The gorgeous ornaments sparkle like the real deal!
Post a Comment